Saturday, March 29, 2014

A Blast From the Past

I landed in Hyderabad, India a couple of days ago and found myself absolutely free (how deliciously joyful that feeling is!) for a few hours. Hyderabad is a city that is very close to my heart for a number of reasons. I decided to make good use of the time and went about doing some exploration by myself...

Reacquainting myself after years, I found myself at Shilparamam, a beautiful flea market/Indian artisans' showcase near Madhapur area. I had forgotten how beautiful local artists creations can be and why I hadn't been there sooner!! (Mental note: pinch self) I was mesmerized for hours strolling through the lanes of stalls filled with pretty things - I could set up camp here! 

Check out the things that had me going ga-ga!

Night Bazaar showcasing everything ethnic, vintage and breathtaking! (You know I'm afflicted with Color Frenzy!)


Lovely summer scarves:

B-e-a-utiful embellished vintage bags!!


 Handmade ethnic ones - so perfect for summer!!


These gorgeous Gujarati work wall hangings and table runners!


Handmade carved wooden boxes that had me wanting to replace every box in my home


Dizzying array of colorful jewelry that begged for a indulgence (I gave in - keep calm and sparkle)


I would call it as good a day as any!

- Cheers!


Wednesday, March 26, 2014

DIY : Aztec Pom Pom Shorts

I'm suffering from a serious case of Color Frenzy. I'm sure many of you know what I'm talking about - you wake up one fine morning and suddenly fall in love with a color and want everything, everything, you own to be in THAT color. When I'm not afflicted with Color Frenzy, if someone makes the mistake of asking what my favorite color is, I just "hang" - until I hear at least one "Don't Bother" - whew!

I've literally thought of printing everything I own with Aztec - until the day came when I saw tattooed fish (yes, tattooed fish! A story for another day) at the pet shop and pictured my goldfishes with Aztec over them - A teeny bit too much - and I had to pick something and go nuts all over it! Not that we need an excuse to wear a plethora of colors all at one - but Summer's here! I'm still not over the Aztec and pom-pom fever we all had last time. 

To get to the point, here are some Aztec pom pom shorts (hurrah!)

Here's what you'll need:

  • A pair of plain shorts 
  • Fabric glue
  • Pom pom (and other optional) trim
  • Fabric paint (I used fabric paint pens)
  • Cardboard cut out to width of the shorts' leg x 2
  • A pen
  • A needle

Step 1: On a piece of paper, decide on the pattern you want. Place the cardboard piece inside the shorts leg and draw the pattern on the shorts.


Step 2: Start outlining and filling in the pattern with fabric paint. Wait till the paint is completely dry before starting on the next leg or side - the one I used took about an hour to dry fully. On very small shapes, you can put a drop of paint and spread with a needle for more accuracy.


Step 3: Paint on all four sides (both legs front and back) of the shorts and leave overnight to hang and dry.


Step 4: Take the trim you chose and cut to leg size. Place around the shorts as shown. 


Step 5: Glue the trim to the shorts a side at a time with fabric glue. Wait to dry completely.


Step 6: Do the same with the pom pom trim and there you have it!


Nothing like flashing a bit of summer color around ;)


Thursday, March 20, 2014

DIY : Colorblocked Earphones

It has been a while since color blocking stuff started trending. There's nothing that's not to love about it ! Add into that the cool-ness of colored headphones (check out some here) and the messy-ness of wires and cords in my travel bags and you get an opportunity to DIY!

Here's what you'll need to do it:
  • A pair of earphones
  • Embroidery thread of different colors
  • Instant drying glue

Step 1: Start by wrapping the cord near the plug-in beginning with a drop of glue.


Step 2: After a few wraps start wrapping the cord with differently-colored embroidery threads with an occasional drop of glue.


Step 3: Wrap up till the "y-junction" of wires. For this part, you'll need to do the 8-Wrap, that is wrap around the cords as if you are tracing the "8" shape a couple of times.


Step 4: Continue along the individual cords until you reach the ear plug. 


Step 5: Embellish, if you prefer!

Here you have it


This was so fun to make- I'm thinking of coloring up the other cords too! :)

-Cheers


Saturday, March 15, 2014

DIY: The Great Gatsby Inspired Pearly Heels

My close ones love to point out the much evident fact that I have a serious love for The Shiny and The Unique (Hmmm.. all that glitter is gold?). I just respond that it is one of the good things about being Indian - we are a very bling-friendly community. One can rock some serious flash at the slightest chance without too many raised eyebrows. There are just so many occasions to bring out your sparkle love - own wedding, close family weddings, distant family weddings, related family weddings, gazillion festivals, get-togethers, the list is just too long!

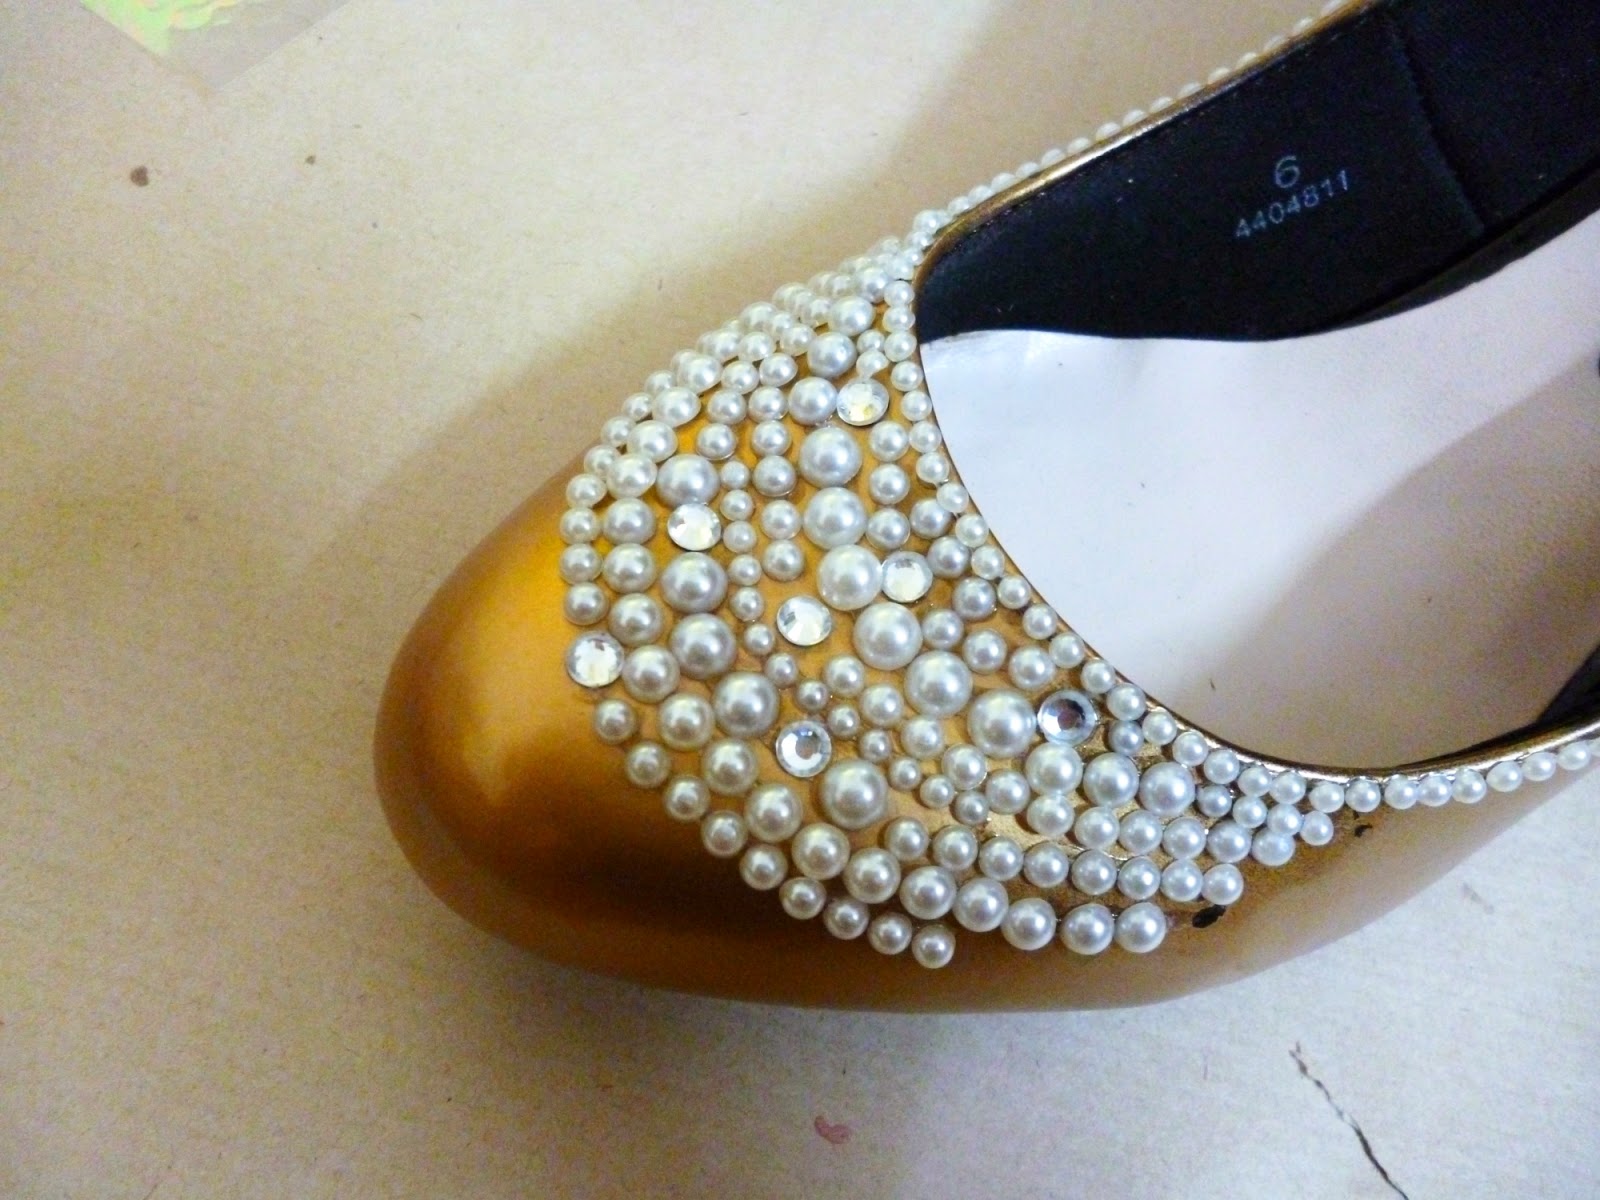
As you know, I've been going bonkers over pearls (among-st other things) lately - pretty much pearl-encrusted anything. So when I saw a pair of heels that I hadn't used for so long probably on their way to donation or disposal, it was a match made in heaven. The end result - cool pearl-dipped shoes (all my favorite words) with a vintage Gatsby feel to them.

Here's what you'll need:
  • A pair of shoes
  • Self-adhesive scrap-booking pearl sticker rows of various sizes. (Used here- 6mm, 4 mm, 3mm, 2mm)
  • Instant drying super glue
  • Gold spray paint


Step 1: Spray paint the shoes antique gold to get the vintage look. I painted the soles as well, for consistency.


Step 2: Start by attaching the adhesive strips from the bottom-sides of the shoe, adding a drop of super-glue intermittently to ensure a longer life. I also added in the rhinestone stickers from time-to-time for a teeny bit of shine.


Step 3: Continue adding rows of random-sized stickers until about half the sides are done.

Step 4: Add in pearls to the front of the shoe, following its shape.


Step 5: Cover up the remaining area as much as possible, ending at the back of the shoe and the heel. I've adding a dripping-pearl effect at the heel (Nope, no such thing as too much pearl)

Step 6: And they're done! You can walk the extra mile and do a pearly clutch too (seen in background). 


-Cheers! 


Sunday, March 9, 2014

DIY : Decorative Floral Rose Ball

A month into Valentine's day. yet roses are in all year round. Which is why Itsy Bitsy India came up with this appropriately named challenge Itsy Bitsy Say It With Roses Challenge. I was debating with myself since the challenge was announced - I knew I wanted to be a part of it, but I wasn't sure how. That is, until I came across this wonderful DIY by Geneva @ A Pair and A Spare and bam! - I knew what I loved :)

I also had the following constraints if I were to go for my own version
  • I wanted something permanent
  • I did not want to spend more than my set limit
  • I wanted it to go with my living room
  • I did not want real flowers to die (I'm weird that way)
So I decided to do my version with paper flowers, thermocol balls and leftover wallpaper.

Here's what you'll need to do this version:
  • A thermocol ball about 14 cm in diameter
  • Wallpaper (can be replaced by any craft paper of your choice)
  • Super Glue (or E6000)
  • Craft Glue (or Fevicol)
  • Drawing pins (I used 28 mm ones)
  • Scissors
  • An old CD (optional)
  • Yarn (optional)


Step 1: Use the CD to draw circles on the back of the wallpaper and cut them out. To cover 1 ball you'll need to have around 40 circles.


Step 2: Cut into the circular shapes spirally, ensuring that all the circles are cut with the same thickness. To add the little edge to the flowers, you can cut imperfectly into the circles (yay!)


Step 3: Start rolling the paper inwards from the edge up till you reach the center, which becomes the base. Glue with quick-drying super glue The gold color comes inside the roll. For a detailed tutorial on how to make rolled paper roses, see here and here. Continue rolling all the spirals up till you get a bunch of paper roses that look like this.


Step 4: Take about a meter of cotton yarn and wrap it around you index and middle finger. Remove after wrapping and you will have a yarn "O" with you. With craft glue, press this "O" vertically onto the thermocol ball and hold down with clear tape. This is to provide an arrangement for hanging the ball later. You can skip this step if you don't plan to hang it.


Step 5: Diagonally opposite to the yarn, put a 2-3 drops of craft glue and place the base of a rose. Push a drawing pin through the center of rose into the thermocol to hold the rose down. Allow to dry.


Step 6: Continue gluing and pinning roses close to each other from bottom up until the whole ball is covered. Leave to dry overnight.


You can even paint on the back of the wallpaper for interesting effects :)


Hang them around your home to enjoy interesting personalized decor!


Thank you in advance ;)


Tuesday, March 4, 2014

The Price of Invulnerability

My dad's favorite teaching to me as a child was that knowledge is power. As a kid, I always assumed it was one of those proverbs that I had to learn to get good grades. As a teenager, I suspected that it was a psychological measure to get me to read and study. It is as an adult I am now seeing how much weight these words hold.


As a 20-something who has seen more than her share of life's downs, I now look back to see what are the techniques I used to help me get through them and I realized that when faced with a challenge, I had put all my energy into gathering all information I possibly could about the problem itself and people like me who had faced them and survived them. Needless to say, this helped me immensely. 


We all go through experiences that hurt and change us. It is through these that we become who we are. On these lines, check out this wonderful TED talk by researcher professor BrenĂ© Brown about vulnerability and happiness. Hopefully it will help you with your
struggles as much as it helped me at a point in time.


Monday, March 3, 2014

DIY : Rope Wrapped Baskets

As someone who is new to the idea of "neat", and housekeeping in general, the enormity of cute homey-stuff is pleasantly overwhelming. I feel I need just about three lifetimes to get the loot that's officially on my house wishlist! Even though I'd rather spend that money on my friendly neighborhood Death By Chocolate sundae (swoon).

When all's a lost cause - pretty rope baskets that I've been eyeing on retail for a long time now - DIY comes to rescue. I don't think most rope baskets tend to hold their shape and I wanted ones that are both pretty and practical.

Here's how you can DIY your personalized rope basket to beautify your home (more importantly - hide the mess)

What you'll need:

  • Plastic storage boxes 
  • Cotton or Jute Rope (lots of it)
  • Fevicol (or any strong craft glue)
  • Super-glue (or E6000)
  • Scotch Tape
  • Varnish
  • Scissors

Here's how to do it:
Step 1: Line up the sides of the box vertically with thin strips of scotch tape - about 10mm width should be ideal.

Step 2: Start by putting a line of craft glue along the length of the box, leaving aside the scotch tape. On the scotch-taped bits, put in a drop of super glue. Place the rope on the glue, pressing down on the scotch tape with the super glue on it. Once, the rope is firmly glued here, press it down onto the plastic with craft glue. Wrap on all four sides of the box like this, once.


Step 3: For round two of the wrap, add a layer of craft glue on the top portion of rope that is already glued. Add in drops of super glue onto the scotch tape. Press the rope down on the glue as done in round one.


Step 4: Continue to do the same around the box up till you reach the top. This might be a bit tougher to do with jute rope than the cotton one, but its worth it.

Leave to dry overnight.


Step 5: If you're using jute rope, you can add wood stain to the box for a beautiful rustic look.

Step 6: Cover with a layer of varnish to seal and give a neater finish.

Ta-da! 


Good luck making unique and interesting storage baskets to style up your home!