Thursday, January 30, 2014

DIY Wallet Revamp

Oh wallet! How I love thee wallet! Why do you have to age wallet?

I got my favorite wallet as a birthday gift 3 years ago. Its not fancy-fancy, but something I could carry everywhere without being too offensive.

Look how pretty!


Years of daily use and the many, many unsuccessful attempts to clean it took a toll of my wallet's life and I had to replace it (:(). Of course, I didn't throw it away (never dispose, never!) and it quietly became another addition to the make-my-home-a-museum-of-curious-paraphernalia project.

Until recently, I stumbled upon it and thought "This could go well with my current colorful, ethnic madness".

If you are on the same train, then here's what you need: (Also, <3)
  • A beloved old wallet
  • Trims and laces of your favorite colors and varying thickness
  • Fabric Glue (here)
  • Leather needle (Optional)
  • Super Glue (Optional)

Here's how to do it:

Step 1: Cut out the trim of your choice to the length of the wallet, leaving an extra half inch on either side.


Step 2: Apply the fabric glue and carefully set to align with the edge of the wallet flap.


Step 3: Continue attaching trims you like one after the other up till the flap and back of the wallet are fully covered. Go nuts here, seriously!


Step 4: Fold over at edges underneath the flap and folds of the wallet and seal with super glue. You can also add a few stitches here and there for better sealing.


Step 5: Cut out the pom pom trim according to the length of the zip and the flap.


Step 6: Attach the final trimming inside the zip fold and underneath the flap of the wallet.


And the sad old wallet has reinvented itself to something I can actually use - what do you think?

Tuesday, January 28, 2014

DIY Inspiration : Leather

I love leather! No matter what you put it onto, it makes a statement. A pretty strong one at that. Its versatility and toughness just can add a whole new look to a casual outfit. That's why looking at the many (many) designer creations that use it makes me want to have a leather-cation (Leave me and my leather alone!)

Here's what I'm lovin' right now:


You can see the first of the series of working with leather here

More leather crafts to follow !!

Monday, January 20, 2014

DIY Floating Stud Bracelets

I'm not usually the one to go for New Year Resolutions - they're so passe (Okay I never stick to them!), but this time I decided to give them one more try. Not the usual for me - run more, be nice (I am, I swear) etc etc - but one that benefits everyone - to minimize wastage.... especially of material, emotion and time.

Keeping in line with this promise, today's DIY is strictly from stuff you can find around the house.

Here's what you'll need:

  • Clear straps (Preferably the free ones that are too flimsy to actually use)
  • Pyramid and spike studs (Taken off weirdly embellished clothes)
  • Lobster clasp, 12 mm
  • Clamp ends
  • 2 small jump rings 6 mm
  • 1 large jump ring 10 mm
  • Super glue
  • Scissors


Step 1: Measure the straps around your wrists and cut to length about 3/4 inch less than your measurement.


Step 2: Place the strap on a flat surface and squeeze a drop of super glue at its center. Carefully place the stud there and let it dry. 


Step 3: Glue studs at regular gaps about 1/2 inches apart, leaving a 1/2 inch gap from the ends of the strap.


Step 4: Add in the clamps at both ends of the strap. Insert a drop of super glue to seal.


 Step 5: With the small jump rings, attach the lobster clasp and the end ring.


Mix 'n match your edgy bracelets :)


Tuesday, January 14, 2014

DIY Quick Nutty Homemade Chocolate Bars

Yesterday was Lohri - a festival much celebrated by the Punjabi community of India to mark the coming of the harvest. My cousin had a celebration over at her place and I wanted to do something special for her.
Given that I don't (yet) have a reputation for being the best cook in my family, i decided to go with something that I love working with - chocolate.

Here's what you need:
  • Half a bar of cooking dark chocolate
  • A handful of peanuts - i used the organic unsalted variety
  • Vanilla essence
Here's what you need to do:

Step 1: Roast peanuts in a pan on low flame for anywhere between 5 to 10 minutes up till they turn a light golden. A tad overdone, but yummy nonetheless.


Step 2: Leave the peanuts to cool. Chop the dark chocolate into chunks.


Step 3:  In a large crock-pot, bring water to a boil. Put the dark chocolate in a smaller crock-pot and carefully place within the larger one. Keep on low flame.


Step 4: Stir continuously till the chocolate melts to avoid burning. Once the chocolate is fully melted, add 2-3 drops of vanilla essence and stir for about a minute.


Step 5: Gently roll the peanuts between your fingers to remove the peanut coverings and add the peanuts to the melted chocolate while still in the crock-pot.


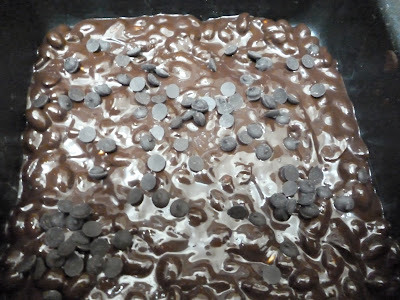
Step 6: Cover the peanuts in chocolate completely and pour the mixture out into a lightly greased baking pan. I added a layer of chocolate chips on top to make it extra nutty. This is, of course, optional!


Step 7: Refrigerate for about 10 minutes. It is important to not refrigerate for long because we don't want the chocolate to get too hard to cut.


Step 8: Cut the chocolate into bite-sized pieces and serve.


These were gone in 15 minutes! :) Cheers

Friday, January 10, 2014

DIY : Gold Twig Necklace

Gold Twig-gy jewelry has caught my eye lately. It has a certain understated appeal, especially in the cold weather when combined with cozy knits. 

I've been looking everywhere for it, but hey if you can't find it, make it!

Here's what you'll need:
  • A small twig of thin-medium width
  • Superglue
  • Gold metallic spray paint
  • Sandpaper
  • Clear nail polish
  • Gold wire
  • Gold chain
  • Lobster clasp
  • Craft Knife
  • 3-4 gold jump rings 

Here's how to make your own twig necklace with an actual twig :) 

Step 1: Choose a few twigs of thin to medium width, depending upon how you want the end result to look. Cut relevant sections of the twig leaving about 5 mm extra on each side.


Step 2: Sand the twig lightly to enhance texture.


Step 3: Apply a thin layer of superglue all over the twig to reinforce it. Leave to dry.


Step 4: Once the twig is completely dry, spray a coat of Gold metallic spray paint on all sides. Add coats as per your preference. I had to use 2 coats to get the color of my liking.


Step 5: Leave to dry completely. Once dry, cover with a coat of clear nail polish to protect against future color change.


Step 6: Wrap small sections of the twig ends with the jewelry wire as shown


Step 7: Add in chain sections of desired length either directly into the trailing wire loops or through a jump ring on either side.


Step 8: Attach the lobster clasp and a jump ring to the other end of the chain 


Here you have it, your very own twig jewelry! Perfect for winter! :)


Thursday, January 2, 2014

DIY : Easy Mosaic Jewelry Storage Box

I hate throwing away boxes. Period. Or any pretty bags, gift wraps, labels and random memorabilia. Over the years, this has added up to a lot of strange collections in nooks and carnies of the house - usually serving the purpose of conversation starters for first timers!   

I always claim to collect them to solve our storage problems. Lucky for me, we live in a teeny apartment and are always, always short of space. Now you see why I have to keep collecting? (Yes I know its a vicious circle!)

I finally have a solution for the tiny jewelry bits lying around the house that I never seem to find when I want. (Also a great way to get rid of those pesky old CD's that no one uses anymore) 

Here's what you'll need:


  • An empty candy box 
  • 3-4 Old CD's
  • Super Glue
  • An old pan
  • A pair of sharp scissors
Here's how it can be done:
  • Empty out the candy box (that's right, enjoy the Ferrero Rocher :D) and remove the labels.
  • Take a pan that is not used for cooking and boil water in it. 
  • Once the water has started boiling, turn the burner off and submerge the CD's into it for 5 minutes. This should soften the plastic a bit and prevent unwanted cracks during the time of cutting.

  • Start cutting the CD's in random shapes with a pair of sharp scissors, taking care to avoid the coating from coming off. As you cut the CD's, the plastic might become hard again due to cooling off, at which point submerge sections of the CD in the hot water for about 10 seconds.
  • Leave the shapes to dry for about 15-20 minutes.

  • Arrange the shapes on the box to how you like them best

  • Apply 2-3 drops of glue to where the shapes should be and continue to cover the box one side at a time.
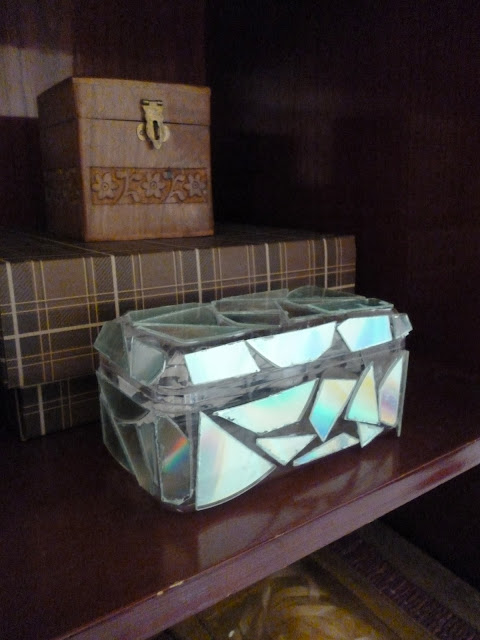
  • Voila! Now you have your very own super modern trinket box!